After some research from this forum, I was able to make Vlan working for my BE6500 via both SSH/UCI and LuCI GUI. Since I am new to GL product, learning SSH/UCI scripting and understanding how LuCI GUI works for Vlan setup took some time. It is quite an experience (and fun) to work through. Credit and acknowledgment are listed in Reference section later in the post.
BE6500 VLAN Configuration via UCI and LuCI
My GL-BE6500 is on firmware 4.8.8.
Planned Vlan environment
- Lan port 1 (router) serves as a trunk port, connected to downstream managed switch
- Vlan 1 (default) – untagged for all 4 physical Lan ports, on router
- Vlan 21 (IOT) – tagged on physical Lan port 1, off on physical Lan port 2/3/4, on router
- Interface for Vlan 21 runs with a static IP of 192.168.21.1/255.255.255.0
- Vlan 21 can only access Wan/Internet, not to other Vlans
- Vlan 1 (default) can access Vlan 21
Pre-conditions: BE6500 is manufactured reset + basic Wan/Lan settings
As @will.qiu pointed out earlier, the Flint3/BE6500 uses swconfig for VLAN management.
Flint3/BE6500 swconfig Switch 1 Ports mapping to Switch Ports and Physical LAN Ports:

It is observed that the Flint3/BE6500 swconfig switch 1 port # order (Red above) appears different from that mentioned earlier in this thread (also in Reference 1)
Part 1 VLAN Configuration via SSH/UCI script
This is a quite straight forward approach by running a SSH/UCI script.
Use SSH or PuTTY (login as root) and run following UCI script
#
#Create VLAN 21 (IOT)
#

#Setup Physical Lan Port 1 as trunk port for downstream AP/switch
#swconfig Switch 1 Port 3 = cpu
#swconfig Switch 1 Port 7 = Physical Lan Port 1

uci set network.vlan_iot='switch_vlan'
uci set network.vlan_iot.device='switch1'
uci set network.vlan_iot.vlan='21'
uci set network.vlan_iot.ports='3t 7t'

#Create sub-interface/device for VLAN 21

uci set network.eth1_21='device'
uci set network.eth1_21.name='eth1.21'
uci set network.eth1_21.type='8021q'
uci set network.eth1_21.ifname='eth1'
uci set network.eth1_21.vid='21'

#Create the IOT interface

uci set network.iot='interface'
uci set network.iot.device='eth1.21'
uci set network.iot.proto='static'
uci set network.iot.ipaddr='192.168.21.1'
uci set network.iot.netmask='255.255.255.0'

#Enable DHCP for IOT

uci set dhcp.iot='dhcp'
uci set dhcp.iot.interface='iot'
uci set dhcp.iot.start='100'
uci set dhcp.iot.limit='150'
uci set dhcp.iot.leasetime='12h'


#Create the IOT firewall zone

uci add firewall zone
uci set firewall.@zone[-1].name='iot'
uci set firewall.@zone[-1].network='iot'
uci set firewall.@zone[-1].input='REJECT'
uci set firewall.@zone[-1].output='ACCEPT'
uci set firewall.@zone[-1].forward='REJECT'
uci set firewall.@zone[-1].masq='1'
uci set firewall.@zone[-1].mtu_fix='1'

#Allow IOT to access WAN

uci add firewall forwarding
uci set firewall.@forwarding[-1].src='iot'
uci set firewall.@forwarding[-1].dest='wan'

#Allow DHCP and DNS on IOT

uci add firewall rule
uci set firewall.@rule[-1].name='Allow-IOT-DHCP'
uci set firewall.@rule[-1].src='iot'
uci set firewall.@rule[-1].proto='udp'
uci set firewall.@rule[-1].dest_port='67-68'
uci set firewall.@rule[-1].target='ACCEPT'

uci add firewall rule
uci set firewall.@rule[-1].name='Allow-IOT-DNS'
uci set firewall.@rule[-1].src='iot'
uci set firewall.@rule[-1].proto='tcp udp'
uci set firewall.@rule[-1].dest_port='53'
uci set firewall.@rule[-1].target='ACCEPT'

#Commit and Reboot

uci commit
reboot
Part 2 VLAN Configuration via LuCI GUI
This approach uses LuCI GUI only. It has 6 steps and does need some patience to get through.
Step 1 Create VLAN 21 (IOT)
· LuCI->Network->Switch
· Add a new Vlan 21 to Switch 1 - tag CPU and Lan 4 (= Physical Lan 1) as trunk port
· Save and Apply
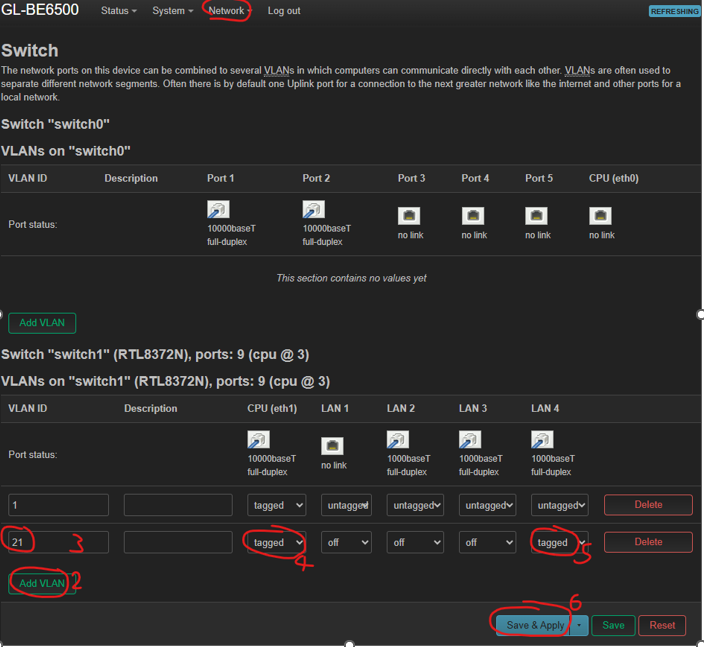
Step 2 Create VLAN 21 Device
· LuCI->Network->Interfaces->Devices
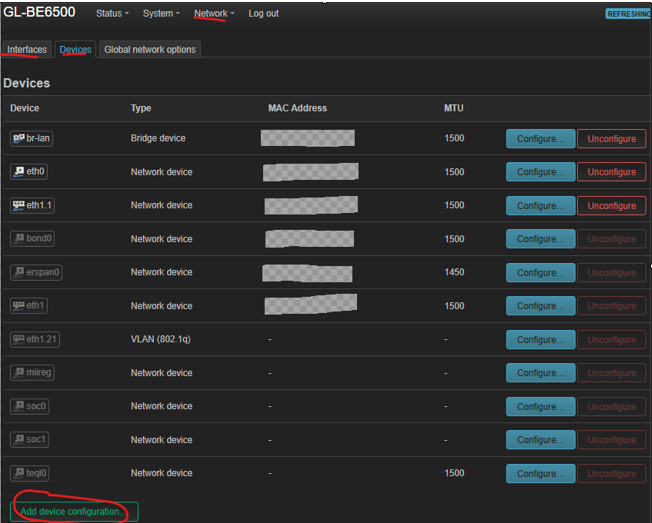
· Click “Add devices configuration”, and select/input info as below, then click Save
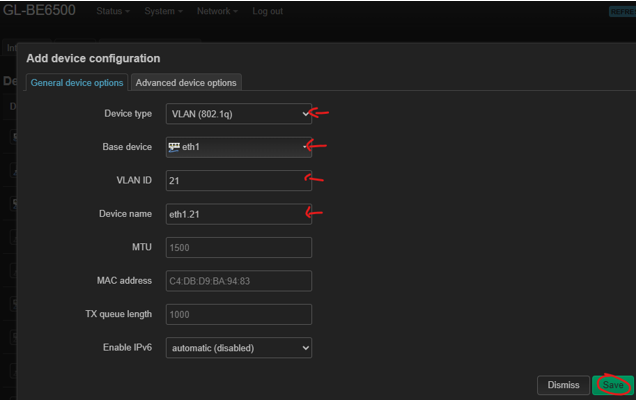
Now Vlan21 device “eth1.21” is created
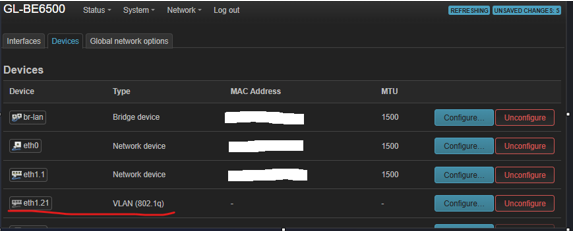
Step 3 Create VLAN 21 (IOT) Interface
· LuCI->Network->Interfaces
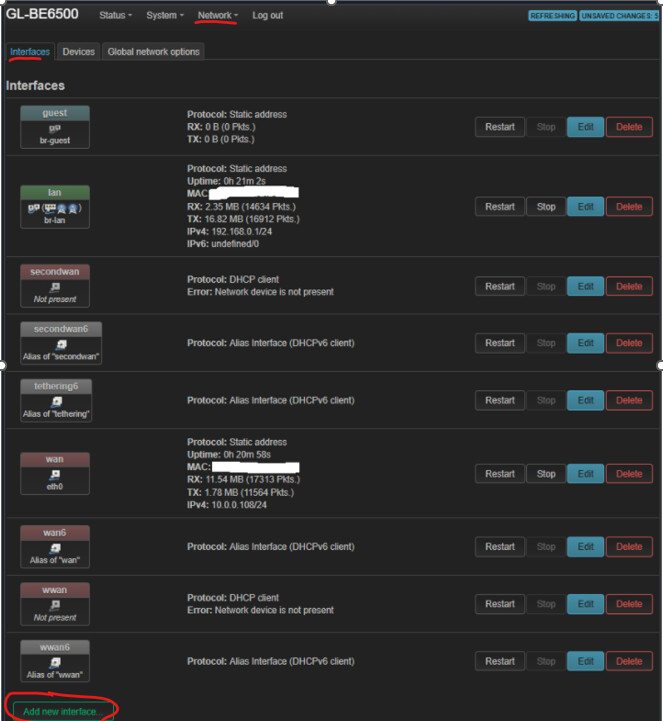
· Click “Add new interface”
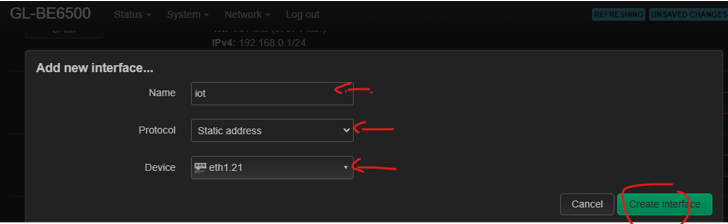
· Click “Create interface”
· Add IPv4 address/netmask: 192.168.21.1/255.255.255.0
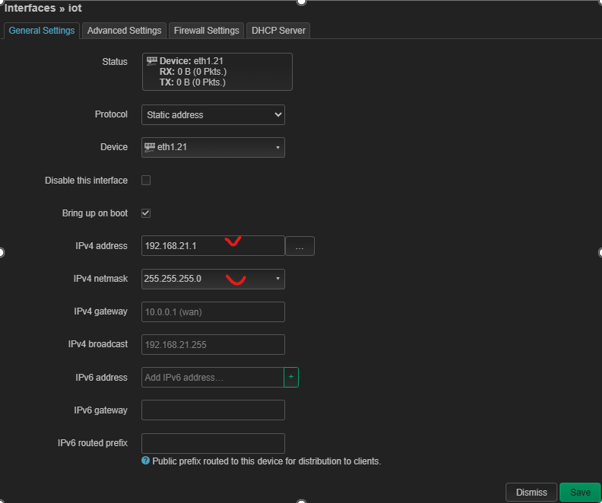
Do not save the above
Step 4 Setup Firewall Zone for VLAN 21 (IOT) Interface
· Goto Interface>iot->Firewall Settings
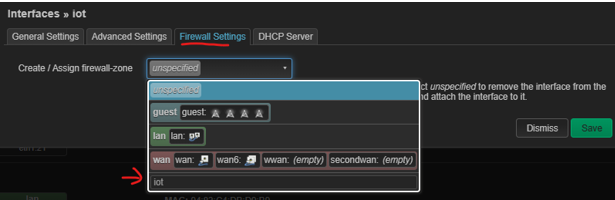
· Click firewall-zone dropdown and type “iot” in empty field, then hit ENTER
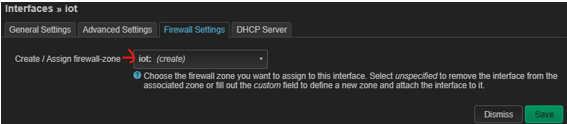
Do not save the above
· Goto Interface>iot->DHCP Server and enable DHCP
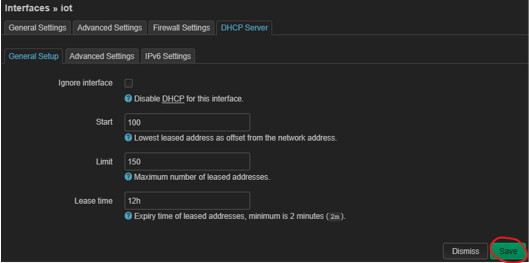
· Click Save to save iot interface
Step 5 Save IOT Interface
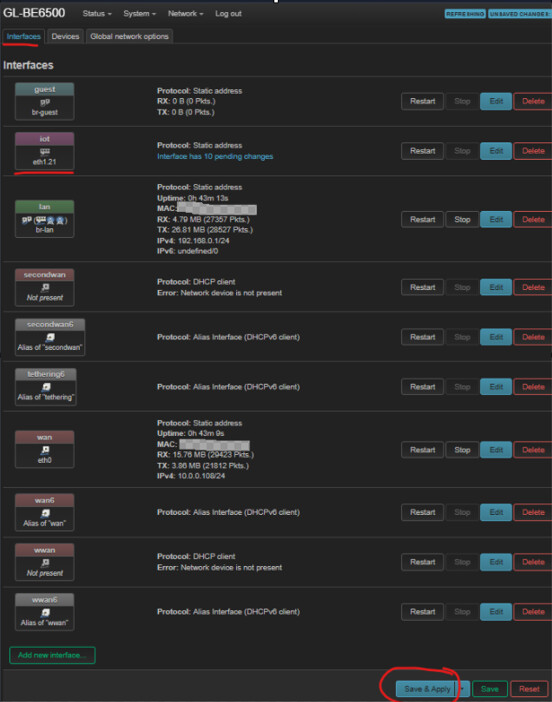
· Click Save and Apply to start/activate the IOT interface
Step 6 Setup IOT Firewall Rules for accessing Wan, DHCP and DNS
· LuCI->Network->Firewall
Step 6.1 Setup IOT Wan Access
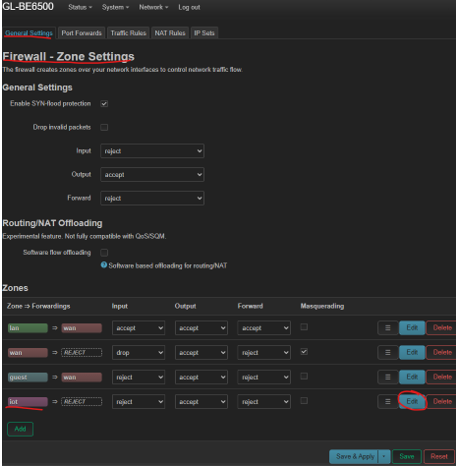
· Click Edit for iot
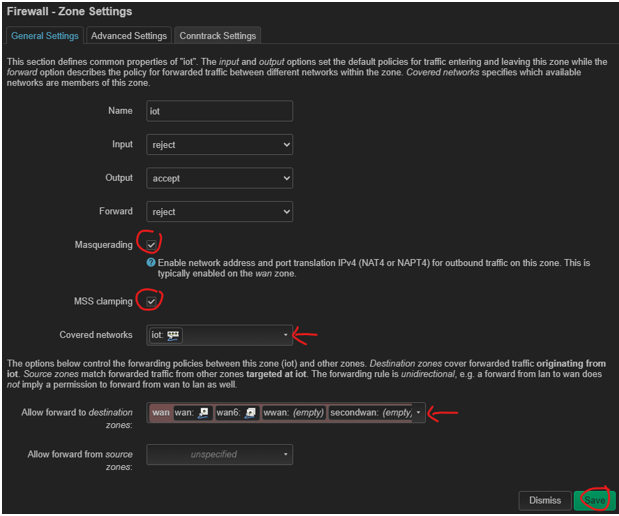
· Click two checkmarks
· For “Allow forward to destination zones”, select Wan line from dropdown, then click Save
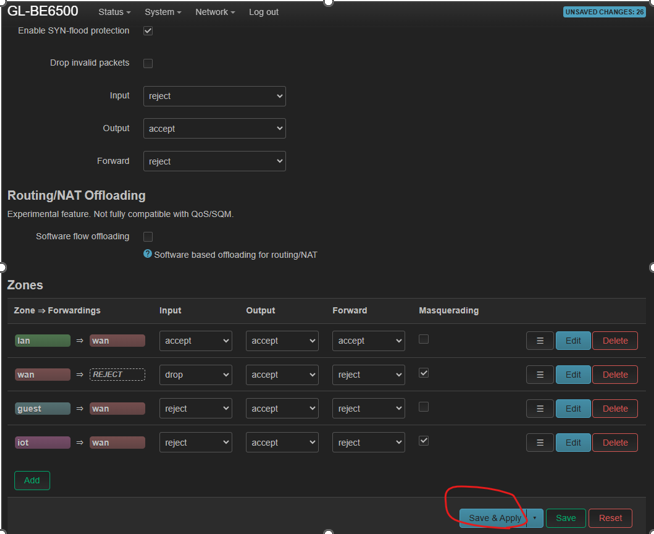
· Click Save and Apply above to enable IOT Wan access
Step 6.2 Setup IOT Traffic Rules for DHCP and DNS
· LuCI->Network->Firewall->Traffic Rules
· Many existing rules are listed here, goto to bottom of the page
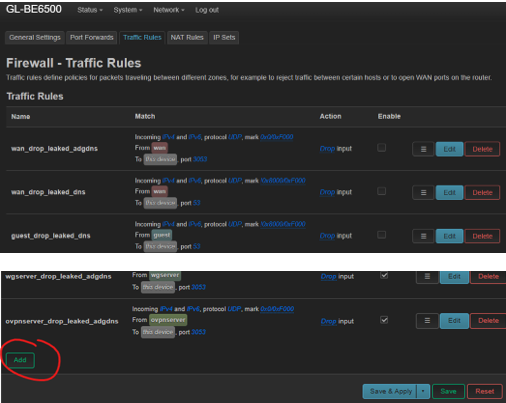
· Click Add for adding new traffic rules
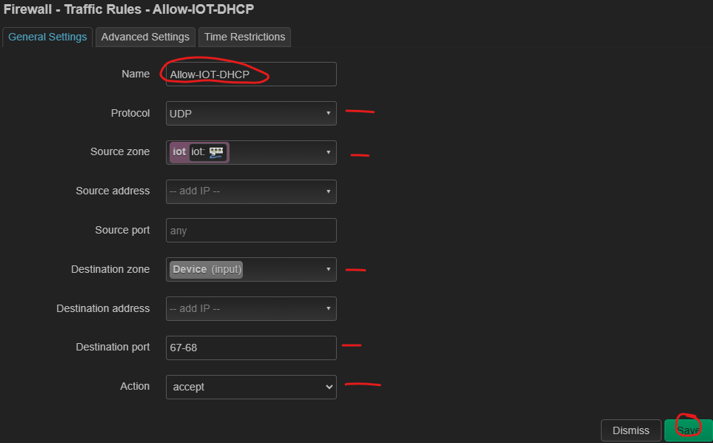
· Add IOT DHCP traffic rule – input info below, then click Save
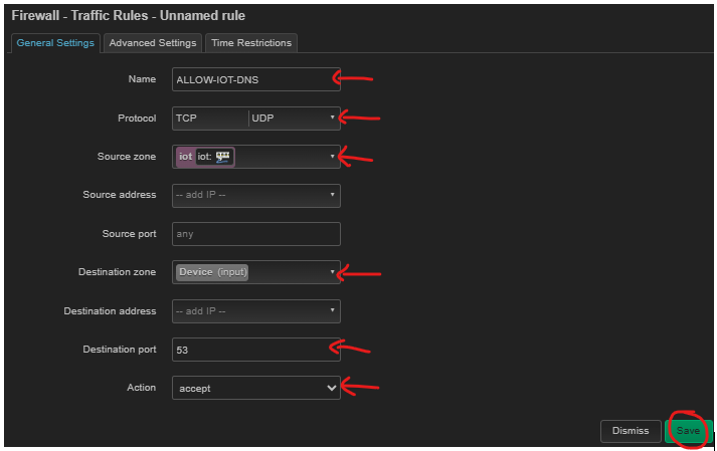
· Add IOT DNS traffic rule – input info below, then click Save
And here is how the two firewall traffic rules look like in Network->Firewall->Traffic Rules list:
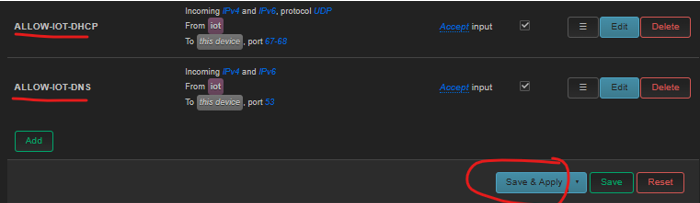
· Click Save and Apply to activate the firewall traffic rules
Up to this point,
· Vlan21 IOT interface should be up and running
· Vlan21 IOT can access to Wan
· Both DHCP and DNS firewall traffic rules should be functional.
· BE6500 physical Lan 1 port, acting as trunk port carrying both Vlan 1 (untagged) and Vlan 21 (tagged), is ready to be connected to a downstream AP or managed switch.
References and Acknowledgment
Significant knowledge/information is learnt and extracted from following references. Credit and appreciation go to linked sites and related authors.
Ref.1 @bruce @will.qiu https://forum.gl-inet.com/t/flint-3-gl-be9300-as-ap-behind-pfsense-multiple-ssids-vlan-random-bssid/66719
Ref.2 WickedYoda: https://www.wickedyoda.com/%f0%9f%9b%a0%ef%b8%8f-vlan-and-guest-network-configuration-on-flint-3-gl-be9300/
Ref.3 OpenWrt: https://openwrt.org/docs/guide-user/network/vlan/switch_configuration
Ref.4 OpenWrt: SSH access for newcomers - https://openwrt.org/docs/guide-quick-start/sshadministration