As a company focused on network security, GL.iNet is committed to providing users with a more robust underlying architecture.
Beginning with firmware v4.8.3, we have made a major upgrade to the system time synchronization component: Chrony (chronyd) is now officially introduced as the default time service, replacing the traditional ntp service (sysntpd), which has shown its limitations under modern security standards.
This improvement enhances the security of Internet time synchronization by adding support for the NTS (Network Time Security) protocol, building a stronger defensive barrier for users' network environments.
The NTP component has been deprecated. In response to earlier community discussions about NTP server configuration and redirection requirements, this guide will be updated and adapted based on the Chrony component.
date
# If the time is incorrect, you can trigger it manually:
/etc/init.d/chronyd restart
Edit the Chrony configuration to enable the time server, please modify [Router LAN IP] according to your LAN IP
echo "allow [Router LAN IP]" >> /etc/chrony/chrony.conf
# For example, allow all clients in the 192.168.8.0/24 subnet to synchronize time from Chrony
echo "allow 192.168.8.0/24" >> /etc/chrony/chrony.conf
Restart Chrony to apply the above new configuration
/etc/init.d/chronyd restart
Check the port 123 status
netstat -uln | grep 123
Configure the firewall to redirect time requests from LAN clients to the router's time server.
There are two kinds of firewall implementations: some use iptables, others use nft (fw4).
How to tell which is used? Judge with simple/non-rigorous method:
cat /etc/os-release | grep "RELEASE"
If the OpenWrt version is ≥ 23, then using nft (fw4); if it is < 23, it generally using iptables.
If your firmware uses iptables, please modify [Router LAN IP] according to your LAN IP
echo "iptables -t nat -A PREROUTING -i br-lan -p udp --dport 123 -j DNAT --to-destination [Router LAN IP]:123" >> /etc/firewall.user
# If your LAN IP range is different, please modify accordingly
# For example, redirect the time request from LAN to Router LAN IP, 192.168.8.1
echo "iptables -t nat -A PREROUTING -i br-lan -p udp --dport 123 -j DNAT --to-destination 192.168.8.1:123" >> /etc/firewall.user
If your firmware uses nftables, please modify dest_ip= according to your LAN IP
uci add firewall redirect
uci set firewall.@redirect[-1].name='Redirect-LAN-NTP'
uci set firewall.@redirect[-1].src='lan'
uci set firewall.@redirect[-1].src_dport='123'
uci set firewall.@redirect[-1].dest_port='123'
uci set firewall.@redirect[-1].proto='udp'
uci set firewall.@redirect[-1].target='DNAT'
# Please modify the next line to match your router's LAN IP (default: 192.168.8.1)
uci set firewall.@redirect[-1].dest_ip='192.168.8.1'
uci commit firewall
Whether using iptables or nftables (fw4), execute after making above changes.
/etc/init.d/firewall restart
When restarting the firewall you may see print such as "invalid"; as long as they don't mention "error," that's normal.
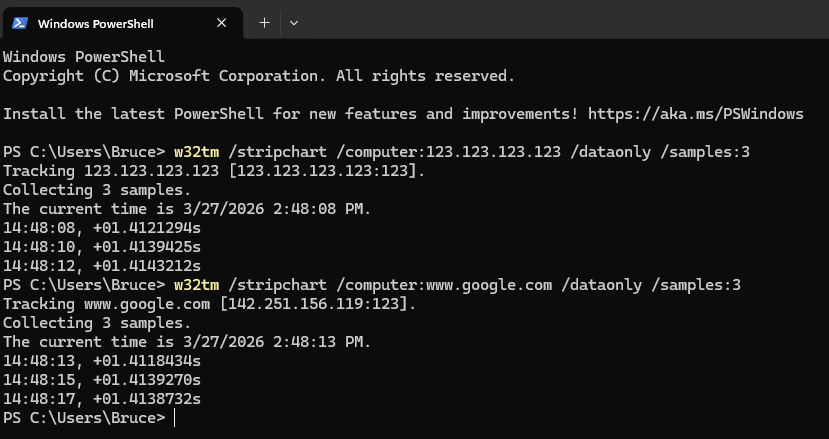
Verify that the redirection is working.
Test using PowerShell on Windows PC on the LAN side. Even if you specify a non-existent IP or Google address, if the result is returned, it means that it is redirected from the router.
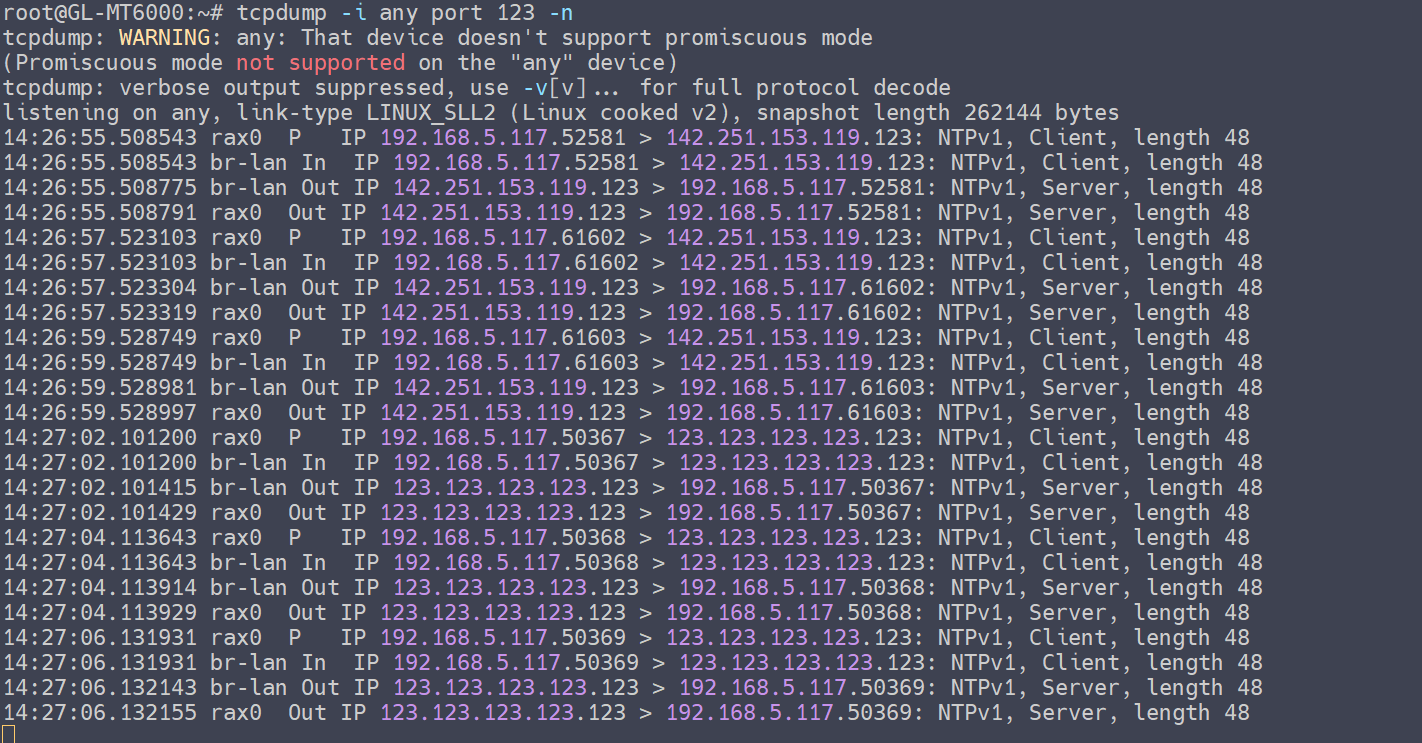
Optional: Capture packets using the tcpdump to verify that the LAN client's time requests are being redirected by the router to own host, where time synchronization is provided by Chrony.
opkg update && opkg install tcpdump
tcpdump -i any port 123 -n
(The router LAN subnet in this example is 192.168.5.0/24, test PC IP is 192.168.5.117)
Reminder: Please note that all commands involving the [Router LAN IP] must be updated to match your actual IP address. Do not simply copy and paste the commands without replacing the placeholder.
Thanks for the tutorial, these are very helpful for setting up new features and local time serving is important when running an internal CCTV system with no internet access.
Setup went smoothly but I ran into a problem verifying, it was because I was trying to verify from a computer that was connected to a VPN and the router (unsurprisingly) cannot intercept VPN traffic. Leaving this comment here in case it helps someone in the future when they search and find this result.
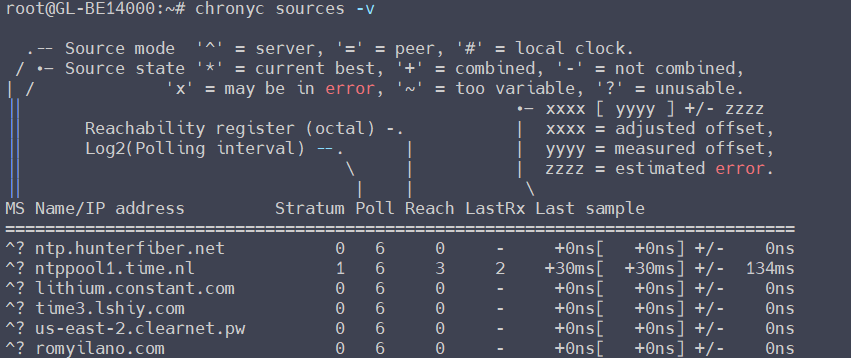
Unless you live in northern Europe, you’ll probably want to use time sources more nearby than those provided in the default configuration. Find those chimers geographically in https://www.ntppool.org/. For worldwide distribution, I would suggest GLI provide the default configuration as pool pool.ntp.org or maybe get your own vendor zone.
For example, since I like to use both the general US pool and my ISP’s more local server, I said
chronyc add pool us.pool.ntp.org iburst burst xleave
chronyc add server ntp.hunterfiber.com iburst burst xleave
chronyc delete nts.netnod.se
chronyc delete ...
I deleted the others I saw in chronyc sources
My question: After I chronyd restart I am back to the servers listed in /var/etc/chronyd/10-uci.conf. I tried editing that file and on restart it was replaced with the factory contents. How can I make my NTP source configuration persistent?
You need to manually modify the /etc/config/chrony configuration file to make the chrony settings persistent.
Alternatively, you can configure it using the uci command:
uci -q delete chrony.@pool[0]
uci -q delete chrony.time_nl
uci -q delete chrony.netnod
uci -q delete chrony.ptb
uci -q delete chrony.dfm
uci -q delete chrony.cifelli

uci add chrony pool
uci set chrony.@pool[-1].maxpoll='12'
uci set chrony.@pool[-1].iburst='yes'
uci set chrony.@pool[-1].nts='yes'
uci set chrony.@pool[-1].hostname='us.pool.ntp.org'

uci set chrony.@dhcp_ntp_server[0]='dhcp_ntp_server'
uci set chrony.@dhcp_ntp_server[0].iburst='yes'
uci set chrony.@dhcp_ntp_server[0].disabled='no'

uci set chrony.@allow[0]='allow'
uci set chrony.@allow[0].interface='lan'

uci set chrony.@makestep[0]='makestep'
uci set chrony.@makestep[0].threshold='1.0'
uci set chrony.@makestep[0].limit='3'

uci set chrony.@nts[0]='nts'
uci set chrony.@nts[0].rtccheck='yes'
uci set chrony.@nts[0].systemcerts='yes'

uci set chrony.hunterfiber='server'
uci set chrony.hunterfiber.hostname='ntp.hunterfiber.com'
uci set chrony.hunterfiber.iburst='yes'
uci set chrony.hunterfiber.nts='yes'

uci commit chrony

/etc/init.d/chronyd restart
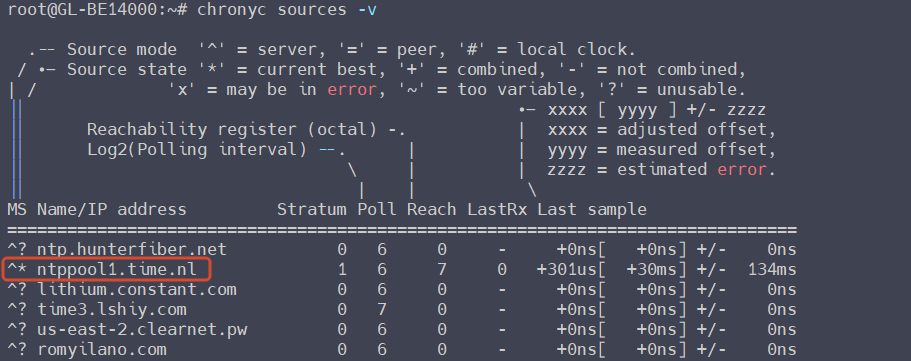
You can verify if the NTS service is running and check the availability of the time servers by the command chronyc sources -v.
Since ntp.hunterfiber.com is unavailable in my location, I have added ntppool1.time.nl back to maintain NTS service availability.
uci set chrony.time_nl='server'
uci set chrony.time_nl.hostname='ntppool1.time.nl'
uci set chrony.time_nl.iburst='yes'
uci set chrony.time_nl.nts='yes'

uci commit chrony

/etc/init.d/chronyd restart
I was playing with this (uci command are definitely more reliable and consistent) and it's worth noting that unless you're a global traveler, you can set the sources to a single source as instructed in theNTP.POOL usage instructionsand leave it be. The DNS used by this service is built to resolve the names to the NTP service nearest you. You can also specify the continental or country sub-zones. Another special note: if you want to ensure the most availability, you can also use the "2" subdomain (i.e., 2.asia.pool.ntp.org) to include IPv6 addresses.