I purchased the Flint 2 in hopes of achieving the following set up. I managed to configure this on the ASUS RT-BE92U but it the router was not stable and kept dropping connectivity. Restarts would help, only to disconnect from the internet a few hours later. The set up was not complicated since the UI/UX is quite friendly on the ASUS, but I'm unable to understand how to set this up on the Flint 2 as a technically inclined, but non-technical person.
Here's what I want to achieve with Nord VPN and paid ControlD DNS
SSID 1 > Canada VPN, ControlD DNS enabled
SSID 2 > US VPN, ControlD DNS enabled
SSID 3 > No VPN, ControlD DNS enabled
SSID 4 > No VPN, No custom DNS
I tried Gemini for help but the instructions were super unclear and not aligned with what I was seeing on the screen in the admin panel and in Luci.
By default, the Flint 2 (GL-MT6000) provides two SSIDs: Main and Guest. Based on your requirements, we can utilize those for your primary and guest needs while creating two additional SSIDs for your specific VPN scenarios.
Planned SSID Architecture:
SSID 1 (Canada VPN): New SSID, routed through VPN (Canada), utilizes ControlD DNS.
SSID 2 (US VPN): New SSID, routed through VPN (US), utilizes ControlD DNS.
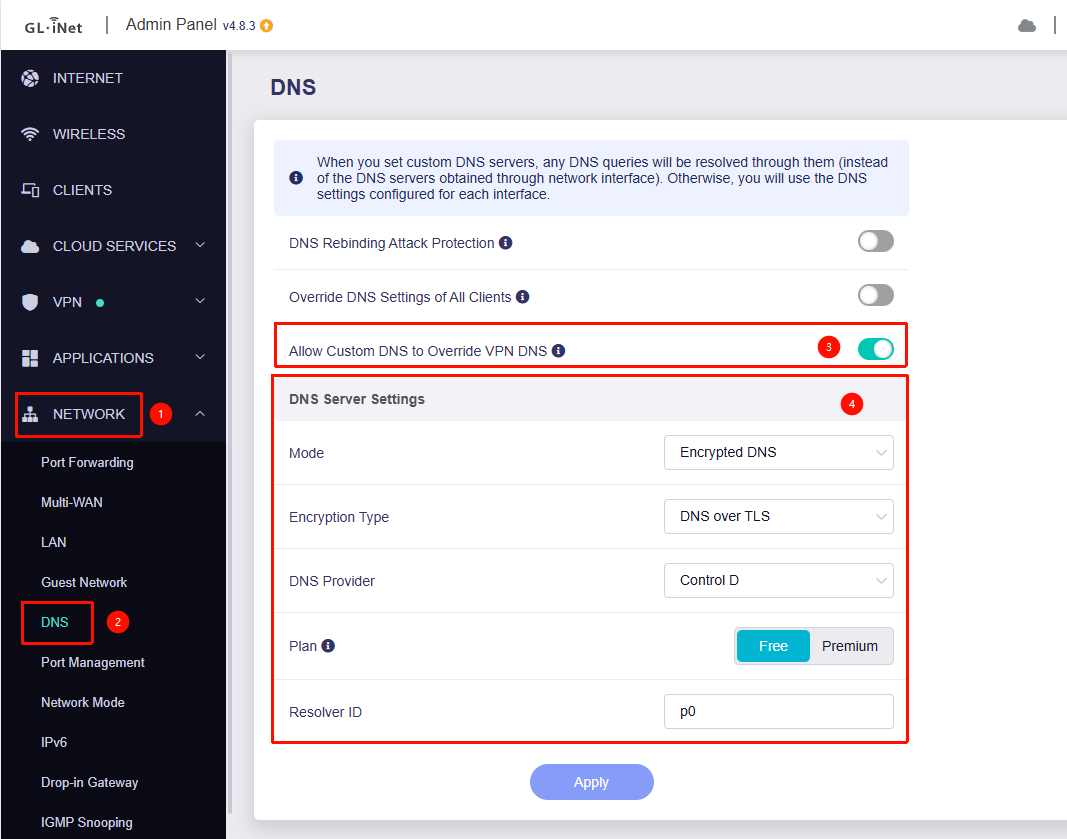
SSID 3 (Main): No VPN, utilizes ControlD DNS.
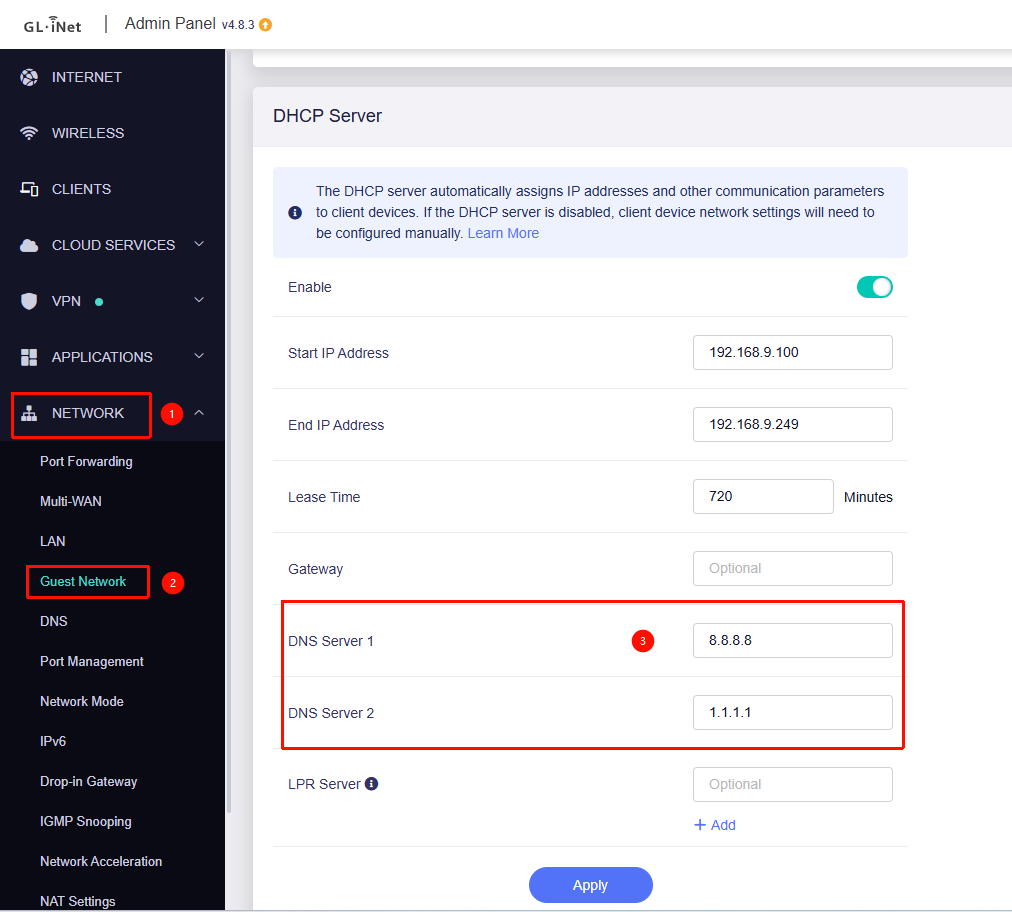
SSID 4 (Guest): No VPN, utilizes standard/provider DNS.
Below is a reference configuration:
Step 1: Create Additional SSIDs via SSH
To create the new network interfaces, wireless SSIDs, and firewall zones, SSH into your router and run the following commands:
# --- Create 'Canada' Interface & Wireless ---

# --- Network Setup ---
uci set network.ca=interface
uci set network.ca.proto='static'
uci set network.ca.ipaddr='192.168.10.1'
uci set network.ca.netmask='255.255.255.0'
uci set network.ca.device='br-ca'
uci set network.ca.type='bridge'

# --- Wireless Setup (5G & 2G) ---
uci add wireless wifi-iface
uci set wireless.@wifi-iface[-1].device='mt798612'
uci set wireless.@wifi-iface[-1].network='ca'
uci set wireless.@wifi-iface[-1].mode='ap'
uci set wireless.@wifi-iface[-1].ssid='GL-MT6000-5G-Canada'
uci set wireless.@wifi-iface[-1].encryption='psk2'
uci set wireless.@wifi-iface[-1].key='goodlife'
uci set wireless.@wifi-iface[-1].ifname='rax2'

uci add wireless wifi-iface
uci set wireless.@wifi-iface[-1].device='mt798611'
uci set wireless.@wifi-iface[-1].network='ca'
uci set wireless.@wifi-iface[-1].mode='ap'
uci set wireless.@wifi-iface[-1].ssid='GL-MT6000-Canada'
uci set wireless.@wifi-iface[-1].encryption='psk2'
uci set wireless.@wifi-iface[-1].key='goodlife'
uci set wireless.@wifi-iface[-1].ifname='ra2'

# --- DHCP Setup ---
uci set dhcp.ca=dhcp
uci set dhcp.ca.interface='ca'
uci set dhcp.ca.start='100'
uci set dhcp.ca.limit='150'
uci set dhcp.ca.leasetime='12h'

# --- Firewall Setup ---
uci add firewall zone
uci set firewall.@zone[-1].name='ca'
uci set firewall.@zone[-1].network='ca'
uci set firewall.@zone[-1].input='ACCEPT'
uci set firewall.@zone[-1].output='ACCEPT'
uci set firewall.@zone[-1].forward='REJECT'

uci add firewall forwarding
uci set firewall.@forwarding[-1].src='ca'
uci set firewall.@forwarding[-1].dest='wan'

uci add firewall forwarding
uci set firewall.@forwarding[-1].src='ca'
uci set firewall.@forwarding[-1].dest='wgclient1'

uci add firewall forwarding
uci set firewall.@forwarding[-1].src='ca'
uci set firewall.@forwarding[-1].dest='wgclient2'


# --- Create 'US' Interface & Wireless ---

# --- Network Setup ---
uci set network.us=interface
uci set network.us.proto='static'
uci set network.us.ipaddr='192.168.20.1'
uci set network.us.netmask='255.255.255.0'
uci set network.us.device='br-us'
uci set network.us.type='bridge'

# --- Wireless Setup (5G & 2G) ---
uci add wireless wifi-iface
uci set wireless.@wifi-iface[-1].device='mt798612'
uci set wireless.@wifi-iface[-1].network='us'
uci set wireless.@wifi-iface[-1].mode='ap'
uci set wireless.@wifi-iface[-1].ssid='GL-MT6000-5G-US'
uci set wireless.@wifi-iface[-1].encryption='psk2'
uci set wireless.@wifi-iface[-1].key='goodlife'
uci set wireless.@wifi-iface[-1].ifname='rax3'

uci add wireless wifi-iface
uci set wireless.@wifi-iface[-1].device='mt798611'
uci set wireless.@wifi-iface[-1].network='us'
uci set wireless.@wifi-iface[-1].mode='ap'
uci set wireless.@wifi-iface[-1].ssid='GL-MT6000-US'
uci set wireless.@wifi-iface[-1].encryption='psk2'
uci set wireless.@wifi-iface[-1].key='goodlife'
uci set wireless.@wifi-iface[-1].ifname='ra3'

# --- DHCP Setup ---
uci set dhcp.us=dhcp
uci set dhcp.us.interface='us'
uci set dhcp.us.start='100'
uci set dhcp.us.limit='150'
uci set dhcp.us.leasetime='12h'

# --- Firewall Setup ---
uci add firewall zone
uci set firewall.@zone[-1].name='us'
uci set firewall.@zone[-1].network='us'
uci set firewall.@zone[-1].input='ACCEPT'
uci set firewall.@zone[-1].output='ACCEPT'
uci set firewall.@zone[-1].forward='REJECT'

uci add firewall forwarding
uci set firewall.@forwarding[-1].src='us'
uci set firewall.@forwarding[-1].dest='wan'

uci add firewall forwarding
uci set firewall.@forwarding[-1].src='us'
uci set firewall.@forwarding[-1].dest='wgclient1'

uci add firewall forwarding
uci set firewall.@forwarding[-1].src='us'
uci set firewall.@forwarding[-1].dest='wgclient2'


uci commit network
uci commit wireless
uci commit dhcp
uci commit firewall

reboot
Step 2: Configure VPN Policy Routing
Once the router reboots, navigate to VPN → VPN Dashboard. Use the VPN Policy settings to assign the new network interfaces (ca and us) to their respective WireGuard client profiles.
Guest DNS Override: Go to Network → Guest Network. You can specify a separate DNS server here (e.g., 8.8.8.8 or 1.1.1.1) so that Guest users bypass your ControlD filters.
Thank you so much! I was able to set it up perfectly with the instructions!
1 quick question: Is it possible to combine the 2.4 and 5 networks? With this set up, I see separate networks for each SSID, effectively giving me 8 total SSIDs with this set up. Is it possible to combine each so that based on the device it auto connects to 2.4 or 5 of each SSID?
Yes, you can achieve this by setting the 2.4GHz and 5GHz SSIDs to the same name.
If you encounter roaming or switching issues, you can enable 802.11k/v to improve performance using the following commands:
for i in $(uci show wireless | grep "=wifi-iface" | cut -d. -f2 | cut -d= -f1); do
    uci set wireless.$i.ieee80211k='1'
    uci set wireless.$i.bss_transition='1'
done
uci commit wireless && wifi reload
@will.qiu With this set up, I noticed that I can only see clients connected to the SSID 3 (Main) but I unfortunately do not see any clients connected to the other 7 networks. This is true for the web module (192.168.8.1) as well as the app.
Could you confirm if there’s a way to see all clients connected to all SSIDs?