Background
The official NetBird binary installer can install the NetBird client on GL.iNet routers, including models based on OpenWrt 21/23 branches. Two additional details need to be handled on these systems:
- Some firmware versions do not provide the
servicecommand expected by the installer. - NetBird stores its default profile under
/var/lib/netbird. On GL.iNet firmware,/varis stored in RAM, so the profile can be lost after a reboot.
This guide uses the official NetBird binary installer, then adds a separate OpenWrt procd service named gl-netbird. The NetBird profile is stored at /etc/netbird/config.json, while frequently changing runtime files remain under /var.
The installation, persistent service, enrollment, update, reboot, and removal flow was tested with NetBird 0.81.2 on:
- Brume 3 (GL-MT5000), firmware 4.9.0, OpenWrt 21.02 base.
- Slate 7 (GL-BE3600), firmware 4.10.1, OpenWrt 23.05 base.
Important Notes
- This is a command-line installation. It does not add NetBird controls to the GL.iNet Admin Panel.
- NetBird is third-party software. These steps are provided on a best-effort basis.
- Coexistence with Tailscale and the effect on normal Internet access were not tested. Running multiple VPN clients can cause routing, DNS, or firewall conflicts. Test locally before enabling them at the same time.
- The Exit Node section configures the router to use an existing NetBird Exit Node. It does not turn the GL.iNet router itself into an Exit Node.
- Exit Node routing can interrupt remote access if the route or firewall is configured incorrectly. Perform that section while you have local access to the router.
- For comparison, see the previous Exit Node guide:
Step 1: Install the Official NetBird Binary
SSH into the router and run:
curl -fsSL https://pkgs.netbird.io/install.sh | sh
netbird version
On some GL.iNet firmware versions, the installer may report that the service executable was not found. This is expected at this stage and will be addressed below.
Step 2: Add the service Compatibility Helper If Needed
Some firmware versions already include a service command, while others do not. Run the block below to check for it. The compatibility helper is created only when the command is missing, and is used during NetBird updates.
if ! command -v service >/dev/null 2>&1; then
    mkdir -p /etc/netbird/bin

    cat > /etc/netbird/bin/service <<'EOF'
#!/bin/sh
# Managed by the GL.iNet NetBird tutorial.
# Created only when the firmware does not provide a service command.
# Used while the official installer updates NetBird.

service_name="$1"
[ -n "$service_name" ] || {
    echo "Usage: service <name> <action>" >&2
    exit 1
}
shift

case "$service_name" in
    *[!A-Za-z0-9_.-]*)
        echo "Invalid service name: $service_name" >&2
        exit 1
        ;;
esac

# Keep the installer-managed netbird service file disposable. All NetBird
# start/stop requests are handled by the persistent procd service instead.
if [ "$service_name" = "netbird" ] && [ -x /etc/init.d/gl-netbird ]; then
    service_name="gl-netbird"
fi

init_script="/etc/init.d/$service_name"
[ -x "$init_script" ] || {
    echo "Service not found: $service_name" >&2
    exit 1
}

exec "$init_script" "$@"
EOF

    chmod 755 /etc/netbird/bin/service
fi
Step 3: Create the procd Service
Run:
cat > /etc/init.d/gl-netbird <<'EOF'
#!/bin/sh /etc/rc.common

START=99
STOP=10
USE_PROCD=1

PROG="/usr/bin/netbird"
INSTALL_URL="https://pkgs.netbird.io/install.sh"

extra_command "update" "Update NetBird with the official binary installer"

start_service() {
    [ -x "$PROG" ] || {
        echo "NetBird binary not found: $PROG" >&2
        return 1
    }

    mkdir -p /etc/netbird /var/lib/netbird /var/log/netbird
    chmod 700 /etc/netbird

    procd_open_instance
    procd_set_param command "$PROG"
    procd_append_param command service run
    procd_append_param command --log-level info
    procd_append_param command --daemon-addr unix:///var/run/netbird.sock
    procd_append_param command --log-file /var/log/netbird/client.log
    procd_set_param env NB_CONFIG=/etc/netbird/config.json
    procd_append_param env NB_DISABLE_SSH_CONFIG=1
    procd_append_param env NB_DNS_STATE_FILE=/var/lib/netbird/state.json
    procd_set_param respawn 3600 5 5
    procd_set_param stdout 1
    procd_set_param stderr 1
    procd_close_instance
}

update() {
    local installer="/tmp/netbird-install.$$"
    local helper_path
    local update_rc

    [ -x "$PROG" ] || {
        echo "NetBird is not installed." >&2
        return 1
    }

    if command -v service >/dev/null 2>&1; then
        helper_path=""
    elif [ -x /etc/netbird/bin/service ]; then
        helper_path="/etc/netbird/bin"
    else
        echo "NetBird service compatibility helper is missing." >&2
        return 1
    fi

    if ! curl -fsSL "$INSTALL_URL" -o "$installer"; then
        echo "Failed to download the NetBird installer." >&2
        return 1
    fi
    chmod 700 "$installer"

    /etc/init.d/gl-netbird stop

    if [ -n "$helper_path" ]; then
        PATH="$helper_path:$PATH" sh "$installer" --update
    else
        sh "$installer" --update
    fi
    update_rc=$?
    rm -f "$installer"

    # The official installer may recreate its own service file. Keep it disabled;
    # gl-netbird is the only NetBird service that should start at boot.
    if [ -x /etc/init.d/netbird ]; then
        /etc/init.d/netbird stop >/dev/null 2>&1
        /etc/init.d/netbird disable >/dev/null 2>&1
    fi
    rm -f /etc/rc.d/S??netbird /etc/rc.d/K??netbird

    /etc/init.d/gl-netbird start

    [ "$update_rc" -eq 0 ] || return "$update_rc"
    "$PROG" version
}
EOF

chmod 755 /etc/init.d/gl-netbird

# Keep the installer-generated service disabled to avoid duplicate processes.
/etc/init.d/netbird disable >/dev/null 2>&1 || true
rm -f /etc/rc.d/S??netbird /etc/rc.d/K??netbird

/etc/init.d/gl-netbird enable
/etc/init.d/gl-netbird start
Step 4: Connect the Router to NetBird
Replace YOUR_SETUP_KEY with the setup key from the NetBird dashboard:
netbird up --setup-key "YOUR_SETUP_KEY"
Check the connection:
netbird status
The status should show that the management and signal connections are connected.
Step 5: Verify Automatic Startup
Reboot the router:
reboot
After the router is available again, reconnect through SSH and run:
/etc/init.d/gl-netbird running && echo "gl-netbird is running"
netbird status
ls -l /etc/netbird/config.json
The gl-netbird service should be running, NetBird should reconnect without another setup key, and /etc/netbird/config.json should still exist.
Step 6: Use an Existing NetBird Exit Node
This section assumes an Exit Node has already been configured in the NetBird network. In the example used for this guide, the existing Exit Node is located in Macao.
6.1 Check the Exit Node in the NetBird Dashboard
In the NetBird dashboard:
-
Open Peers and confirm that the Macao routing peer is online and marked as an Exit Node.
-
Open the Exit Node configuration and confirm that its distribution groups include the group containing this GL.iNet router.
-
Decide whether to enable Auto Apply:
- When enabled, eligible peers use the Exit Node automatically unless a user previously made a manual selection.
- When disabled, the Exit Node is offered to the router but must be selected manually.
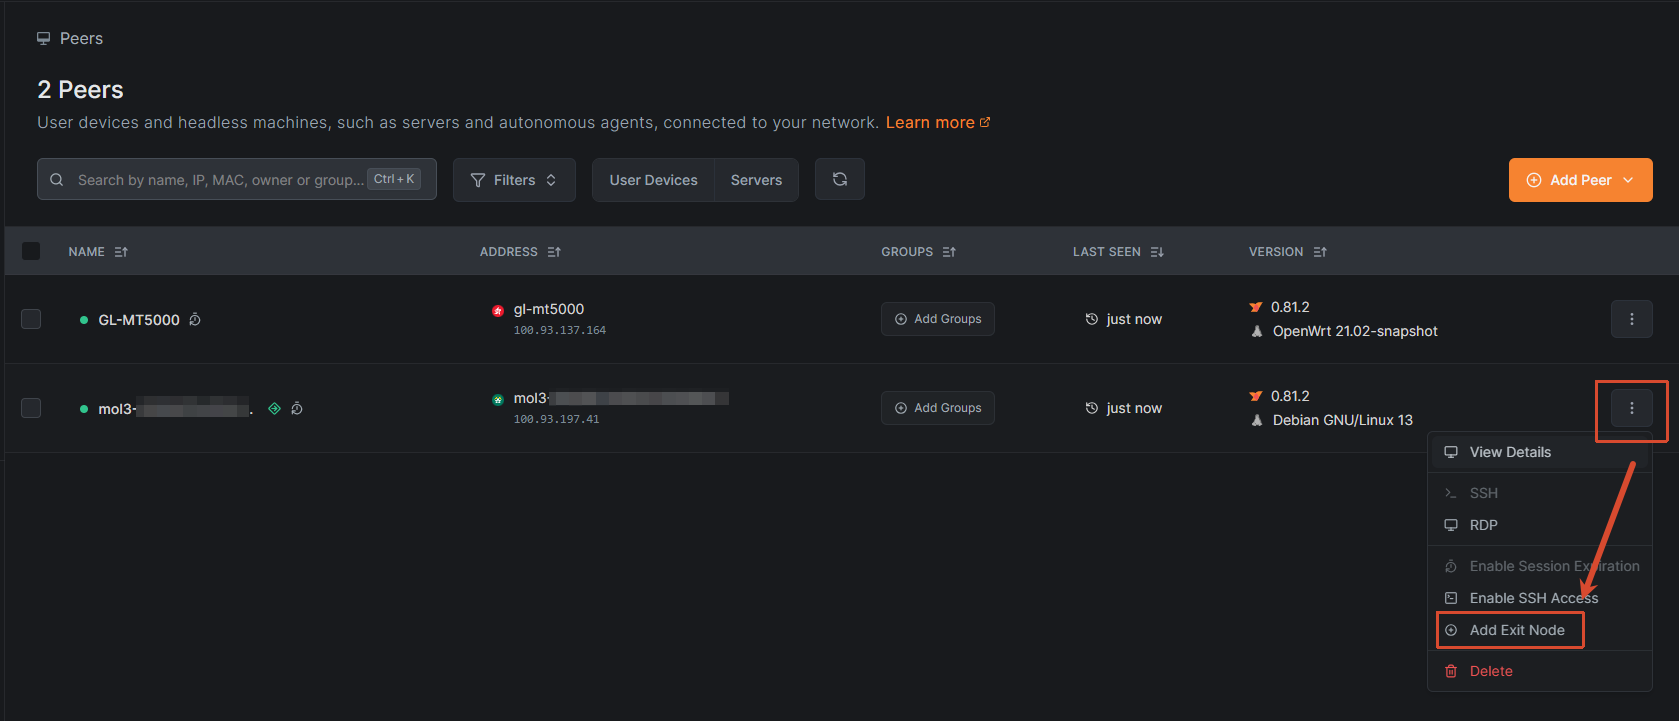
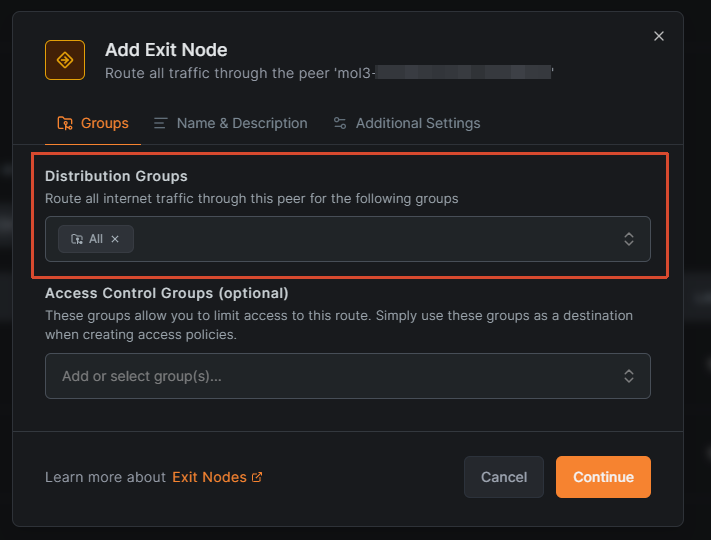
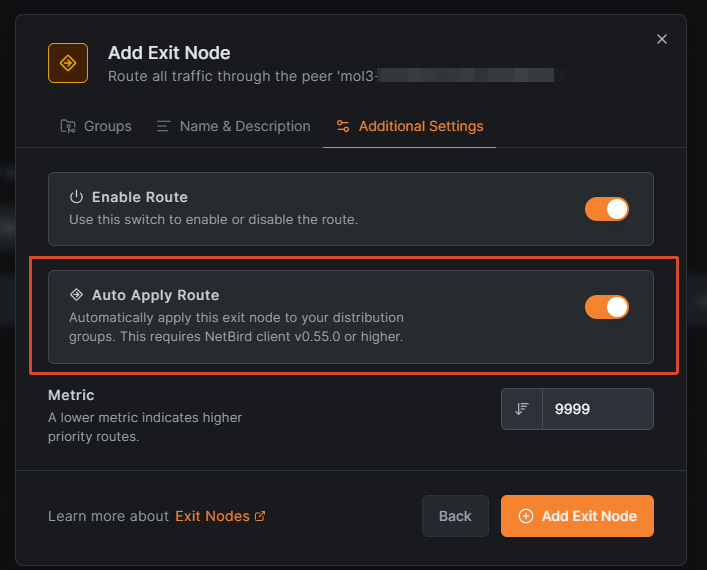
Configure a reachable NetBird DNS server for the same peer group with the match domain set to ALL if DNS queries should also use the Exit Node path. Otherwise, DNS may continue to use the router's local resolver.
If the Exit Node is selected but domain names stop resolving, check netbird status and the dashboard DNS configuration. Nameservers: 0/0 Available means that no NetBird nameserver is currently available to the router. To keep using the router's existing DNS instead, run:
netbird up --disable-dns
This disables NetBird DNS management but does not disable NetBird routing. DNS requests may then leave through the router's original DNS path rather than the Exit Node. To re-enable NetBird DNS after a reachable nameserver has been configured, run:
netbird up --disable-dns=false
An Exit Node route also covers networks reachable behind the Exit Node. If the Macao peer is dedicated to Internet egress and its local LAN should not be reachable, enable Block LAN access for that routing peer or isolate it on a dedicated network segment.
6.2 Select the Exit Node on the Router
List the available NetBird networks and their selection status:
netbird networks list
If the Macao Exit Node is already shown as selected, no additional command is required. If it is available but not selected, copy its identifier and run:
netbird networks select -a "<EXIT_NODE_ID>"
The -a option preserves any other networks that are already selected.
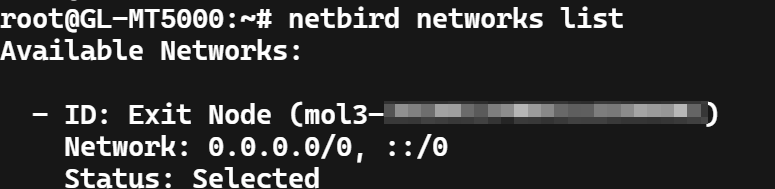
Confirm that the default route was received:
netbird status -d
The selected Exit Node should be associated with 0.0.0.0/0 in the output.
6.3 Allow LAN Devices to Use the Exit Node
Selecting the Exit Node changes the router's NetBird route. To send traffic from devices connected to the GL.iNet router through the same route, add the NetBird tunnel to the OpenWrt firewall.
First, confirm that the NetBird tunnel device exists:
ip link show wt0
Use either LuCI or the UCI commands below. Both methods create the same netbird firewall zone and lan → netbird forwarding path.
Option A: Configure the Firewall with LuCI
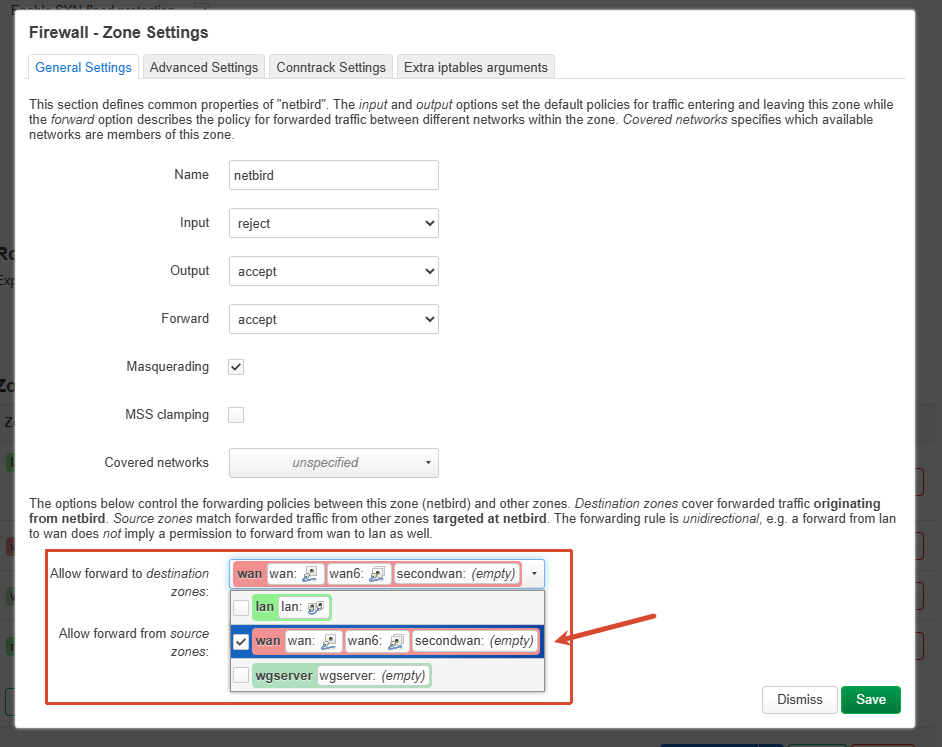
Then open GL.iNet Admin Panel → SYSTEM → Advanced Settings to enter LuCI, and go to Network → Firewall → General Settings.
- Click Add to create a zone named
netbird. - Set Output and Forward to
accept. Set Input toacceptonly if NetBird peers should be able to reach services on the router; otherwise usereject. - Enable Masquerading.
- Leave Covered networks unspecified.
- Under Allow forward from source zones, select
lan. Selectguestas well only if Guest-network clients should use the Exit Node. - Open Advanced Settings and select
Ethernet Adapter: wt0under Covered devices. - Click Save, then Save & Apply.
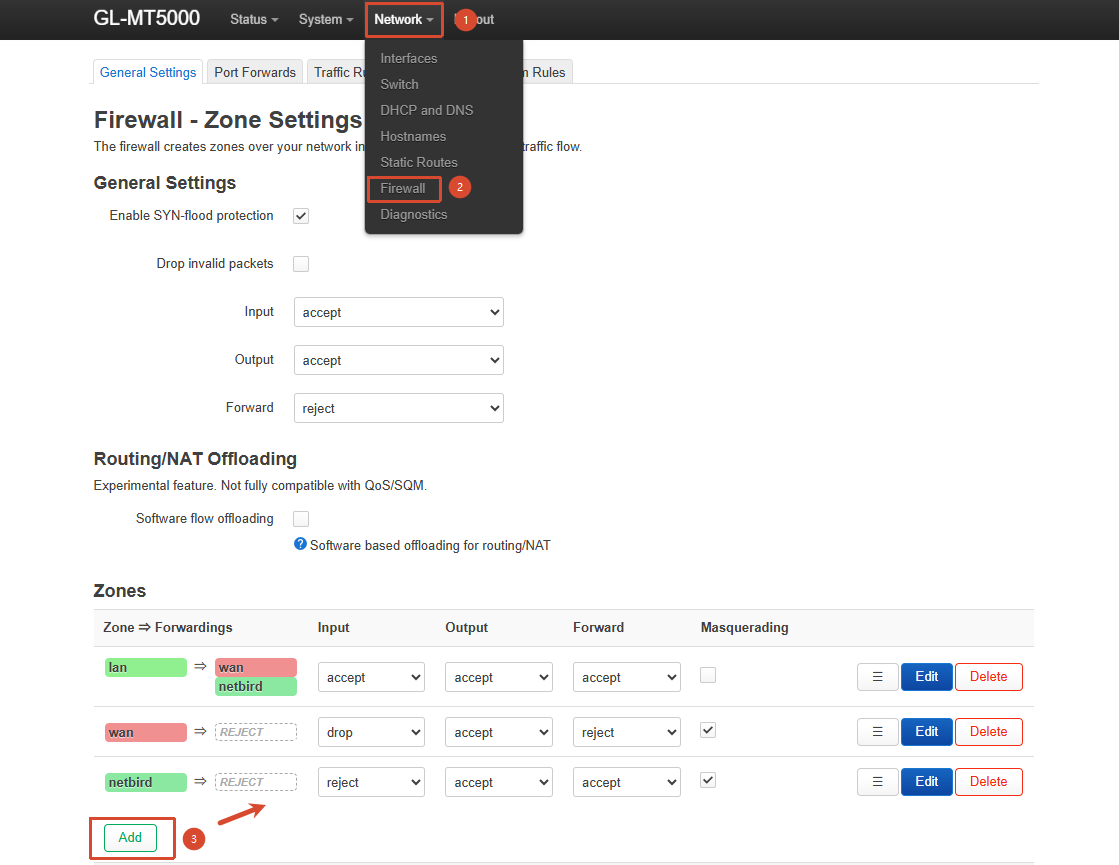
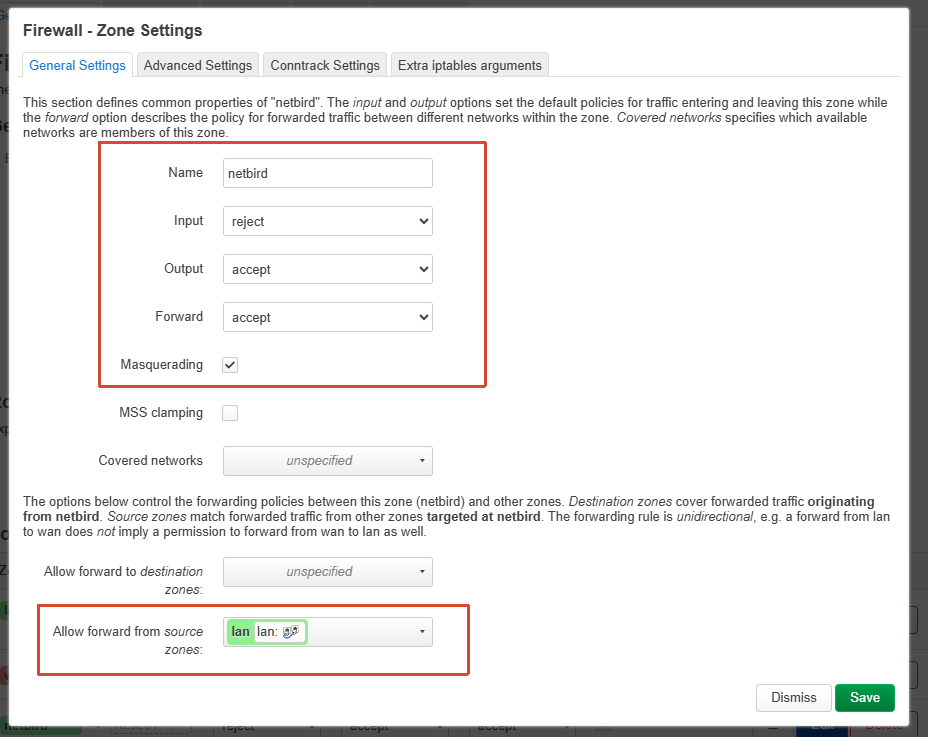
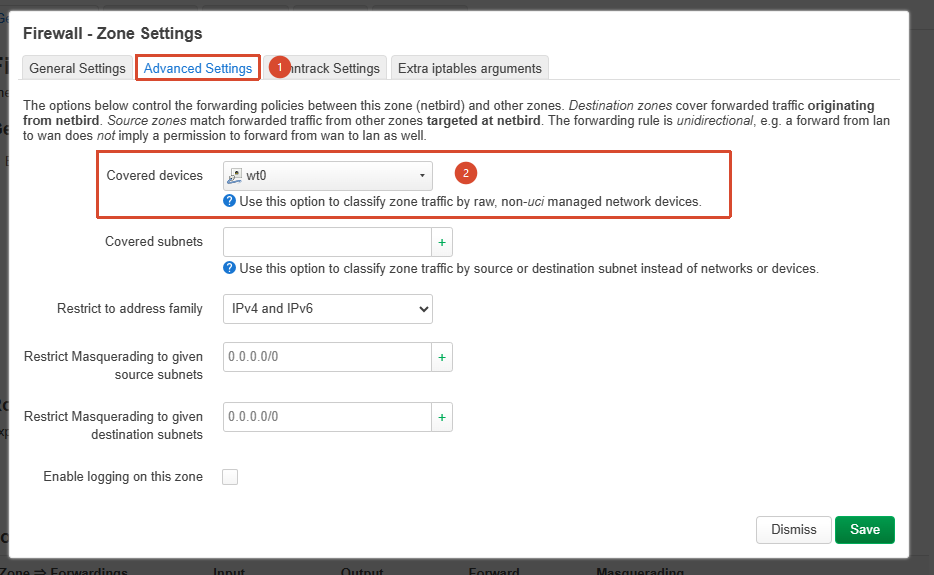
Adding WAN as a source zone is not required for routing normal LAN clients through the Exit Node. Add only the local source zones whose clients should use NetBird.
Option B: Configure the Firewall with UCI
Instead of using LuCI, run the following commands over SSH. The named UCI sections make the configuration repeatable and allow it to be removed precisely later.
uci -q delete firewall.netbird
uci -q delete firewall.lan_to_netbird

uci set firewall.netbird='zone'
uci set firewall.netbird.name='netbird'
uci set firewall.netbird.input='REJECT'
uci set firewall.netbird.output='ACCEPT'
uci set firewall.netbird.forward='ACCEPT'
uci set firewall.netbird.masq='1'
uci add_list firewall.netbird.device='wt0'

uci set firewall.lan_to_netbird='forwarding'
uci set firewall.lan_to_netbird.src='lan'
uci set firewall.lan_to_netbird.dest='netbird'

uci commit firewall
/etc/init.d/firewall restart
The default above rejects connections from NetBird peers to services on the router. If those peers should be allowed to reach the router itself, change the zone's Input policy:
uci set firewall.netbird.input='ACCEPT'
uci commit firewall
/etc/init.d/firewall restart
To let Guest-network clients use the Exit Node as well, add a separate forwarding only when required:
uci -q delete firewall.guest_to_netbird
uci set firewall.guest_to_netbird='forwarding'
uci set firewall.guest_to_netbird.src='guest'
uci set firewall.guest_to_netbird.dest='netbird'
uci commit firewall
/etc/init.d/firewall restart
Check the resulting UCI sections:
uci show firewall.netbird
uci show firewall.lan_to_netbird
uci -q show firewall.guest_to_netbird
6.4 Verify the Exit Location
From the router, check the public IPv4 address:
curl -4 https://ipinfo.io
Run the same check from a device connected to the router. Both results should match the public IP address of the Macao Exit Node.
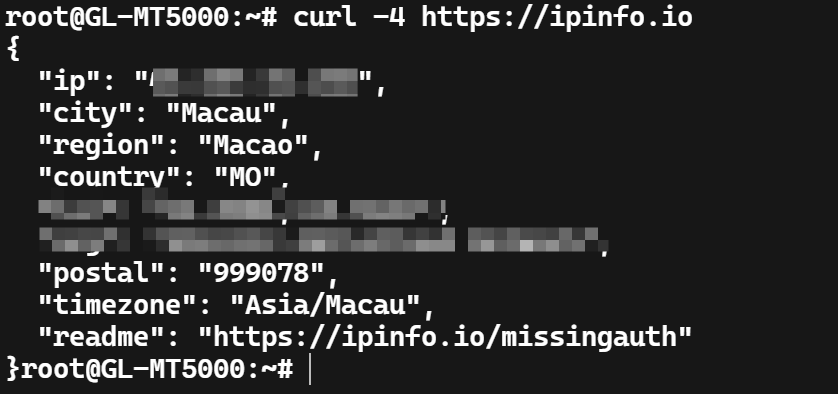
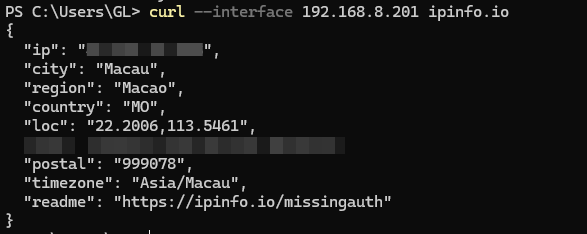
If the router shows the Macao address but a LAN client does not, recheck the netbird firewall zone, the wt0 covered device, Masquerading, and the lan → netbird forwarding permission.
To stop using the Exit Node while keeping NetBird connected, run:
netbird networks deselect "<EXIT_NODE_ID>"
Manual selection or deselection is remembered by the client and takes precedence over Auto Apply. To use the Exit Node again, repeat the netbird networks select -a command.
Updating NetBird
Use the following command to check for and install the latest binary with the official installer:
/etc/init.d/gl-netbird update
/etc/init.d/gl-netbird running && echo "gl-netbird is running"
netbird status
The update command downloads the official installer, stops gl-netbird, and uses the firmware's existing service command or the compatibility helper created in Step 2. It then disables the installer-generated service and starts gl-netbird again. The configuration under /etc/netbird is preserved. If the installed version is already current, the installer reports that it is up to date and the same gl-netbird service is restarted.
Some older OpenWrt builds may display ps: unrecognized option: e while the official installer checks for the desktop UI process. On a headless router, this warning does not prevent the binary update. Confirm the version and connection status with the commands above.
Do not rerun the plain installation command to update an existing installation. The official installer requires its --update mode, which the command above handles.
Common Commands
# Show status
netbird status

# Stop NetBird
/etc/init.d/gl-netbird stop

# Start NetBird
/etc/init.d/gl-netbird start

# Restart NetBird
/etc/init.d/gl-netbird restart

# Disconnect without uninstalling
netbird down

# Reconnect
netbird up
Uninstalling NetBird
If you also want to remove this router from your NetBird account, run the following command first:
netbird deregister
If you skip this command, the local client will still be removed, but the peer entry will remain in the NetBird dashboard until you delete it there.
Then remove the optional firewall configuration before deleting NetBird. If you used LuCI, delete the netbird zone in LuCI → Network → Firewall and click Save & Apply. If you used the UCI method in this guide, run:
uci -q delete firewall.guest_to_netbird
uci -q delete firewall.lan_to_netbird
uci -q delete firewall.netbird
uci commit firewall
/etc/init.d/firewall restart
This prevents a stale wt0 firewall reference after NetBird is removed. Then remove the service, binary, configuration, and runtime files:
/etc/init.d/gl-netbird stop >/dev/null 2>&1 || true
/etc/init.d/gl-netbird disable >/dev/null 2>&1 || true
/etc/init.d/netbird stop >/dev/null 2>&1 || true
/etc/init.d/netbird disable >/dev/null 2>&1 || true
rm -f /etc/rc.d/S??netbird /etc/rc.d/K??netbird

rm -f /etc/init.d/gl-netbird /etc/init.d/netbird
rm -f /usr/bin/netbird
rm -rf /etc/netbird /var/lib/netbird /var/log/netbird
rm -f /var/run/netbird.sock /var/run/netbird.pid
The official NetBird binary installer currently provides an update option but not a complete uninstall option, so the manual cleanup above is required.
Notes
- The installer-generated
/etc/init.d/netbirdfile may be recreated during an update. This is normal. It remains disabled;gl-netbirdis the startup service used by this guide. - The compatibility helper under
/etc/netbird/binis created only on firmware that does not already provide aservicecommand. - A firmware upgrade may remove custom binaries or scripts. If NetBird is missing afterward, repeat the installation steps and reconnect only if the existing configuration was not preserved.
- The NetBird setup key is required only for the initial enrollment unless the router is deregistered or its persistent configuration is removed.
References
NetBird installation script:
https://pkgs.netbird.io/install.sh
NetBird CLI documentation:
NetBird client environment variables:
NetBird OpenWrt configuration persistence discussion:
NetBird Exit Node documentation:
OpenWrt NetBird procd service implementation:
OpenWrt firewall configuration reference:
OpenWrt UCI reference: